Have you ever set up your tent only to find water seeping through the seams during a rainstorm? It’s frustrating and can ruin your outdoor adventure.
The good news is, you don’t have to deal with soggy gear anymore. Seam sealing your tent is a simple step that can keep you dry and comfortable no matter the weather. In this guide, you’ll discover exactly how to seam seal your tent quickly and effectively.
By the time you’re done reading, you’ll know how to protect your tent from leaks and enjoy every camping trip with confidence. Let’s get started!
Why Seam Sealing Matters
Seam sealing is a key step in caring for your tent. It protects the tent from water and damage. Without seam sealing, water can sneak through tiny needle holes. These holes form when the tent is sewn together. Sealing these seams keeps the inside dry and comfortable. It also helps keep your tent strong for many trips.
Preventing Water Leaks
Seam sealing stops water from entering through stitched lines. Rain can soak through these tiny holes easily. This can make your tent wet inside. Wet gear and sleeping bags lead to a bad camping experience. A good seam seal creates a waterproof barrier. It keeps you dry, even in heavy rain. This simple step protects your shelter from leaks.
Extending Tent Lifespan
Seam sealing adds extra protection to your tent fabric. It prevents water damage that can weaken the material. Over time, unsealed seams can crack and wear out. Sealing slows this damage and keeps seams strong. This means fewer repairs and longer use. A well-sealed tent lasts for many camping seasons. It saves money by avoiding early replacements.
Tools And Materials Needed
Seam sealing a tent helps keep water out and protects your gear. Using the right tools and materials makes the job easier and more effective. This section covers what you need before starting your seam sealing project.
Choosing The Right Seam Sealer
Pick a seam sealer made for your tent’s fabric. Silicone-based sealers work well on nylon and polyester tents. Polyurethane sealers suit canvas tents better. Check the label to ensure compatibility with your tent material. Some sealers dry clear, others leave a slight shine. Choose one that dries fast to save time. Avoid sealers with strong smells or toxic chemicals.
Essential Accessories
Gather tools to prepare and apply the seam sealer properly. Clean cloths or sponges help wipe seams before sealing. Use a small brush or applicator to spread the sealer evenly. Masking tape can protect areas around seams from extra sealant. A hair dryer helps speed drying if weather is cold or humid. Have gloves ready to keep your hands clean and safe.
Preparing Your Tent
Preparing your tent before seam sealing is very important. It helps the sealant stick well and keeps your tent waterproof. Take time to get your tent ready for the best results.
Cleaning The Seams
Start by cleaning all the seams carefully. Use a soft brush or cloth to remove dirt and dust. Avoid harsh chemicals; mild soap and water work best. Clean seams help the sealant bond properly to the fabric.
Drying Completely
Let your tent dry fully after cleaning. Moisture can stop the sealant from sticking well. Place the tent in a dry, shaded area to air dry. Make sure every seam is dry before you start sealing.
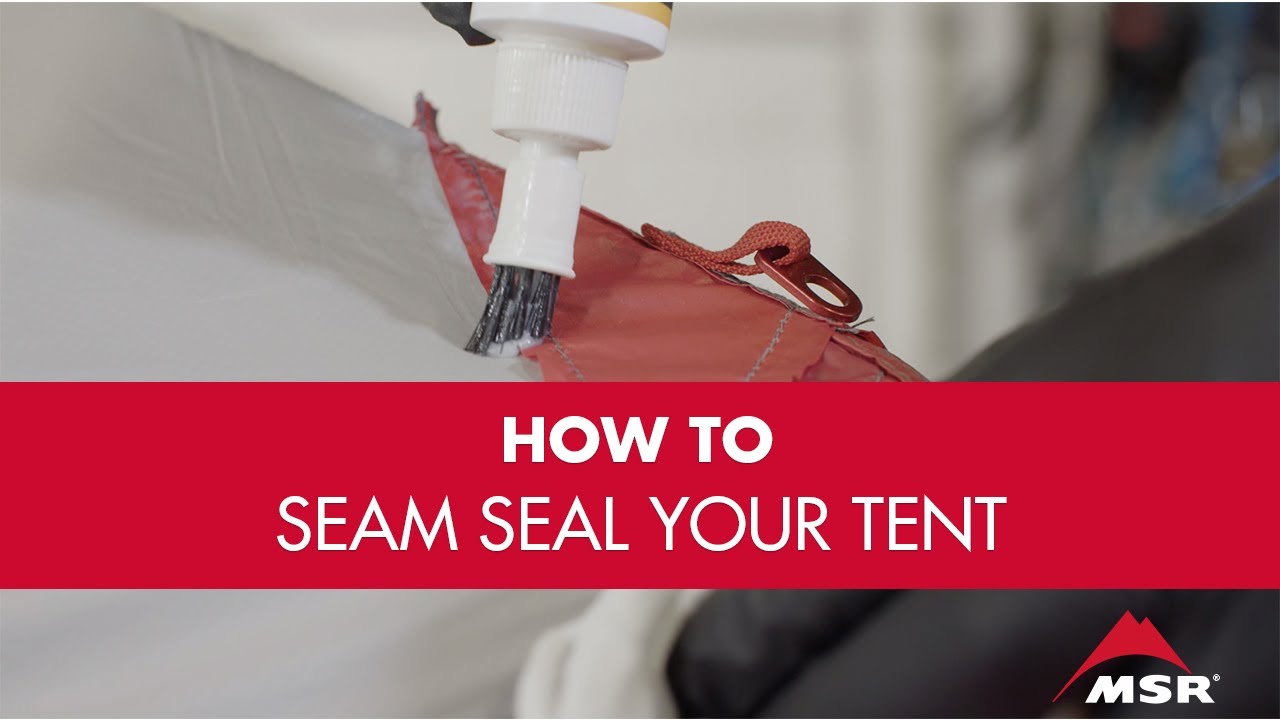
Step-by-step Seam Sealing
Seam sealing a tent is important to keep it waterproof. Following clear steps makes the process easy and effective. This section explains how to apply seam sealer properly and avoid common errors. Proper sealing protects your tent from rain and moisture during camping trips.
Applying Seam Sealer Evenly
Start with a clean, dry tent surface. Use a small brush or applicator for control. Apply a thin, steady line of sealer along each seam. Make sure the sealer covers the entire stitch area. Avoid applying too much sealer; it can cause lumps and slow drying. Let the sealer dry fully before using or packing the tent.
Avoiding Common Mistakes
Do not skip cleaning the seams before sealing. Dirt or oils stop the sealer from sticking well. Avoid sealing in cold or humid weather; it slows drying. Don’t rush to pack the tent before the sealer dries. Check for missed spots or thin coverage after drying. Proper care ensures your tent stays dry and strong.
Drying And Curing Time
Seam sealing a tent is only part of the process. Drying and curing time is just as important. It lets the sealant set and stick well. Rushing this step can cause leaks later. Taking time helps your tent stay waterproof and strong.
Optimal Conditions
Drying works best in warm, dry places. Avoid cold or humid spots. Heat helps the sealant cure faster. Sunlight is good but avoid direct intense rays. A shaded area with good airflow is ideal. Keep the tent flat and stretched out. This prevents creases that stop drying.
How Long To Wait
Wait at least 24 hours before packing the tent. Some sealants need up to 48 hours to cure fully. Check the instructions on your sealant tube. Touch the seams gently to test if dry. They should feel firm and not sticky. Avoid folding or using the tent too soon. Patience here protects your tent from leaks.

Credit: www.greenbelly.co
Maintaining Waterproofing Over Time
Maintaining the waterproofing of your tent is essential for a dry and comfortable camping experience. Seam sealing protects your tent from leaks, but over time, wear and weather can reduce its effectiveness. Regular care keeps your tent ready for any weather.
Regular Inspections
Check your tent seams often. Look for cracks, peeling, or worn areas in the sealant. Use a flashlight to spot any small holes or weak spots. Early detection helps prevent water from entering during rain.
Reapplying Seam Sealer
Clean the seams before adding new sealer. Use a mild soap and water, then let dry completely. Apply the seam sealer evenly along the seams. Follow the product instructions for the best results. Let it dry fully before packing your tent.
Tips For Different Tent Fabrics
Seam sealing a tent keeps water out and protects the fabric. Different fabrics need different care. Knowing the right way to seal nylon and polyester tents helps the seal last longer. This guide shares useful tips for each fabric type.
Nylon Vs Polyester
Nylon tents often have a smoother surface. Use a seam sealer that works well with nylon’s slick finish. Choose a flexible, water-based sealer. It sticks well and stays soft after drying.
Polyester tents have a rougher texture. Use a thicker seam sealer to fill the gaps. A silicone or polyurethane-based sealer works best. It creates a strong, waterproof layer on polyester.
Always test the sealer on a small patch first. This prevents damage and ensures good adhesion.
Special Considerations
Some tents have a waterproof coating. Avoid harsh cleaners that remove this layer. Clean gently with mild soap and water before sealing.
Sealing seams in cold weather can make the sealer thick. Warm the sealer slightly to improve flow and coverage.
Apply the sealer in thin layers. Let each layer dry completely before adding more. This avoids clumps and peeling.
Credit: www.youtube.com
Common Problems And Fixes
Seam sealing a tent can sometimes lead to common problems. These issues may reduce the tent’s waterproof ability. Identifying and fixing these problems early keeps your tent dry and durable. Here are two frequent problems and how to fix them.
Peeling Seams
Peeling seams happen when the sealant does not stick well. This issue often occurs on old tents or after rough handling. Dirt or moisture on the seams can stop the sealant from bonding properly.
To fix peeling seams, first clean the area with mild soap and water. Let the seams dry completely. Next, apply a thin layer of seam sealant evenly. Press the seam gently to help the sealant stick. Let it dry for at least 24 hours before using the tent again.
Uneven Application
Uneven application means the sealant is thick in some spots and thin in others. This causes weak points where water can enter. It also wastes sealant and makes the tent look messy.
Fix uneven application by using a small brush or applicator. Spread the sealant smoothly and evenly along the seam. Avoid applying too much at once. Multiple thin layers work better than one thick layer. Allow each layer to dry before adding another.

Credit: sectionhiker.com
Frequently Asked Questions
What Is Seam Sealing In Tent Maintenance?
Seam sealing protects tent seams from water leaks. It involves applying a waterproof sealant to stitched areas. This process enhances tent durability and keeps the interior dry during rain.
How Do You Prepare A Tent For Seam Sealing?
Clean the tent seams thoroughly with mild soap and water. Let them dry completely. Removing dirt and moisture ensures better sealant adhesion and effectiveness.
What Materials Are Needed For Tent Seam Sealing?
You’ll need a seam sealer, a clean cloth, and a small brush or applicator. Some sealers come with applicator tips for precise application on seams.
How Often Should You Seam Seal Your Tent?
Seam sealing is recommended once a year or after heavy use. Check seams regularly for wear and reseal to maintain waterproof protection.
Conclusion
Seam sealing a tent keeps water out and protects your gear. It helps your tent last longer and stay strong. Use the right sealant and follow simple steps carefully. Let the seams dry completely before packing your tent. Check seams regularly to catch leaks early.
A well-sealed tent means a dry, comfortable camping trip. Take time to seal seams right. Your tent will thank you on every adventure.