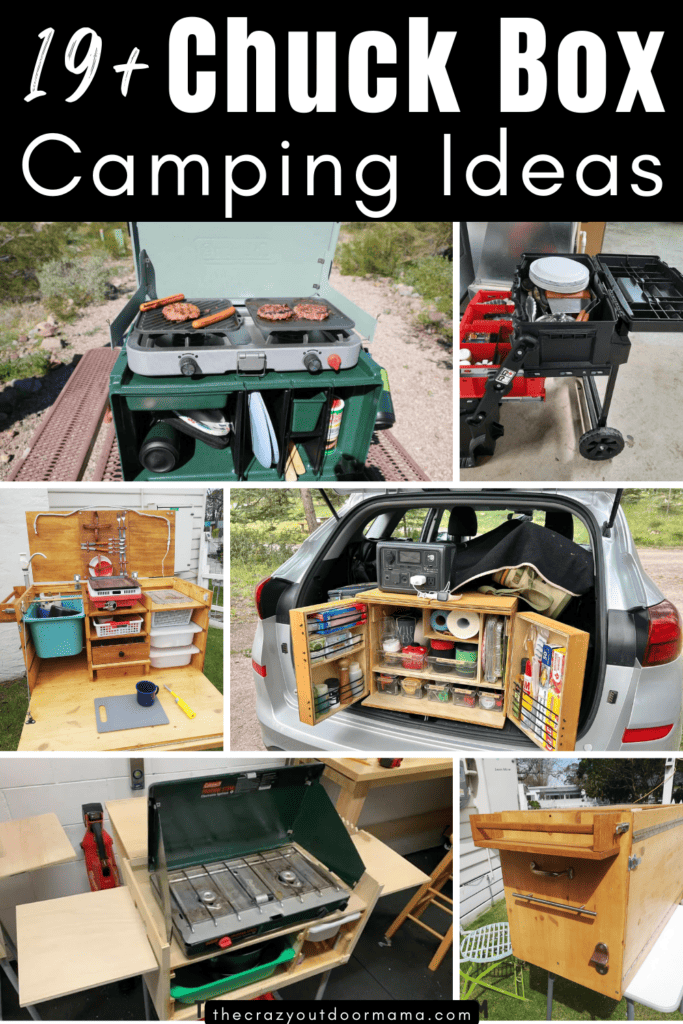
Imagine having everything you need for cooking on your camping trips, all packed neatly in one box. No more digging through bags or forgetting essential utensils.
Building your own camp kitchen box can make your outdoor cooking simple, organized, and enjoyable. In this guide, you’ll discover easy steps to create a kitchen box that fits your style and needs. By the end, you’ll be ready to cook like a pro under the open sky.
Ready to make your next camping meal hassle-free? Let’s get started!

Credit: www.youtube.com
Choosing The Right Materials
Choosing the right materials is key to building a strong camp kitchen box. The materials affect durability, weight, and ease of use. Selecting good wood, hardware, and tools makes your project easier and the final product better. This guide explains what materials work best.
Wood Types And Benefits
Choose wood that resists moisture and is easy to clean. Plywood is a popular choice because it is light and strong. Cedar wood works well outside due to its natural resistance to rot. Pine is affordable and easy to work with but needs sealing to protect against water. Avoid soft woods that can break easily.
Hardware Essentials
Pick hardware that holds up to outdoor use. Stainless steel screws and hinges resist rust. Use strong handles for easy carrying. Choose latches to keep the box closed during travel. Make sure all metal parts fit well and work smoothly to avoid problems later.
Tools You’ll Need
Gather simple tools before starting. A saw cuts wood to size. A drill helps make holes for screws and handles. Sandpaper smooths rough edges. Screwdrivers tighten screws securely. A tape measure ensures accurate dimensions. Basic tools help you build your box quickly and correctly.
Designing Your Camp Kitchen Box
Designing your camp kitchen box is the first step to a smooth cooking experience outdoors. It needs to fit your space and carry all essentials. A well-planned box makes cooking easier and more fun. Focus on size, storage, and workspace for the best results.
Size And Portability
Choose a size that fits your vehicle and camping style. A box too big becomes hard to carry. Too small means less space for gear. Look for lightweight materials to keep it easy to move. Compact designs save room but still hold what you need.
Storage Compartments
Divide your box into sections for utensils, spices, and tools. Separate compartments keep things neat and easy to find. Use removable trays or bins for quick packing and unpacking. Clear or labeled compartments reduce searching time.
Workspace Features
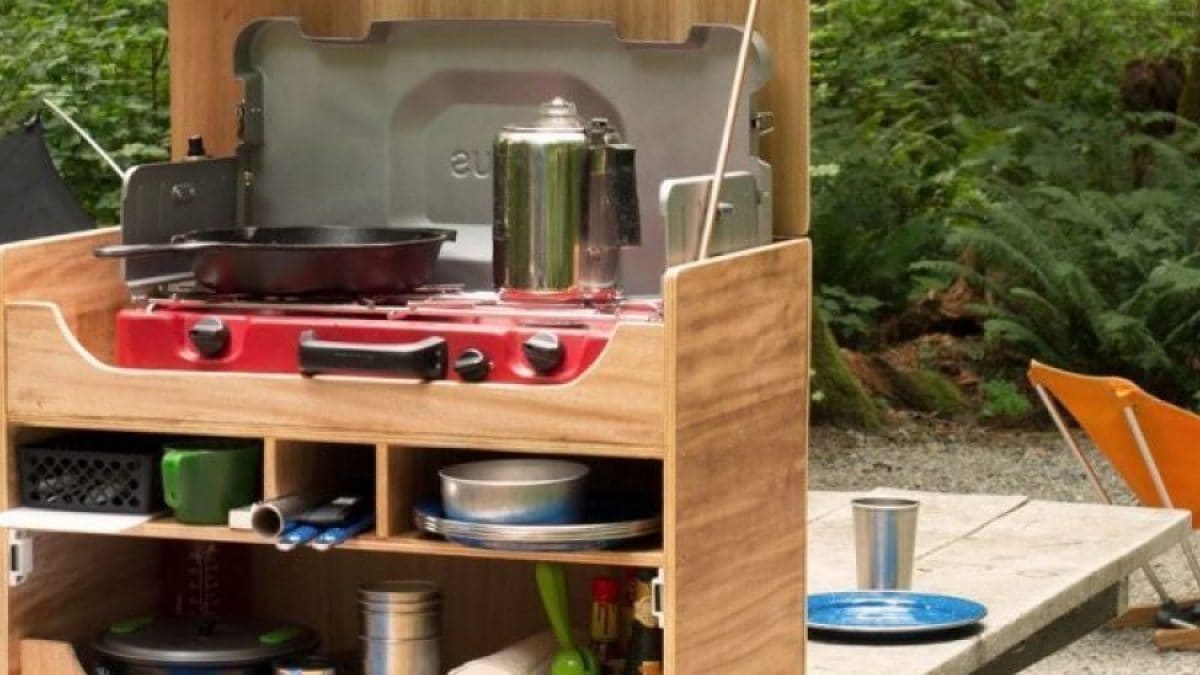
Include a flat surface for chopping and cooking. A fold-out table or slide-out tray works well. Add hooks or holders for towels and utensils nearby. A sturdy workspace helps keep everything steady and clean.
Step-by-step Construction
Building a camp kitchen box is easier than it sounds. Follow clear steps to create a sturdy and practical box. This guide breaks down the process into simple parts. Each step helps you build a strong kitchen box for camping trips.
Cutting And Preparing Wood
Start with quality plywood or hardwood panels. Measure and mark wood pieces according to your design. Use a saw to cut wood carefully along the lines. Sand the edges smooth to avoid splinters. Prepare all panels before moving to assembly.
Assembling The Frame
Arrange the cut wood pieces into the box shape. Use wood glue at joints for extra strength. Secure corners with screws or nails. Check that the frame is square and sturdy. Let the glue dry before adding shelves or drawers.
Adding Shelves And Drawers
Measure the inside space for shelves or drawers. Cut boards to fit these spaces snugly. Attach shelves using screws or brackets for support. Build simple drawers with side panels and a base. Fit drawers into the frame, ensuring smooth movement.
Installing Hardware
Choose handles, hinges, and latches that suit your box size. Attach hinges to the lid for easy opening. Fix handles on drawers and the main box for carrying. Use latches to keep the box securely closed. Test all hardware to ensure proper function.
Credit: www.thecrazyoutdoormama.com
Customizing For Outdoor Cooking
Customizing your camp kitchen box makes outdoor cooking easier and more fun. It helps keep everything neat and ready to use. You can add special features to fit your cooking style and needs. A well-planned box saves time and space while camping.
Incorporating A Stove Stand
A stove stand lifts your camping stove off the ground. This keeps the stove stable on uneven surfaces. It also protects your camp kitchen box from heat damage. Use sturdy wood or metal for a strong stand. Make sure it fits your stove size perfectly.
Water Storage Solutions
Water is essential for cooking and cleaning outdoors. Choose a container that fits inside your kitchen box. A small, sealable jug or collapsible water bag works well. Add a spout or tap for easy pouring. Keep water close to avoid carrying heavy loads.
Utensil And Spice Organization
Organize utensils in a small, divided box or pouch. This keeps forks, spoons, and knives tidy. Use small jars or containers for spices. Label them clearly to find flavors fast. This setup speeds up cooking and keeps your kitchen neat.
Finishing Touches
Finishing touches give your camp kitchen box a complete, polished look. These details protect your box from weather and wear. They also make it easier to carry and keep your items safe. Proper finishing ensures your kitchen box lasts through many camping trips.
Weatherproofing Techniques
Weatherproofing stops water from damaging your kitchen box. Start by sanding all surfaces smooth. Use waterproof glue for joints and seams. Apply a waterproof fabric or tape on edges for extra protection. These steps keep moisture out and wood strong.
Painting And Sealing
Choose paint made for outdoor use. It protects wood from sun and rain. Apply one or two coats evenly. Let each coat dry well before the next. After painting, use a clear sealant. This adds a layer of defense against scratches and water.
Adding Handles And Locks
Handles make carrying your box easier and safer. Use sturdy metal or wooden handles on each side. Secure them tightly with screws. Locks keep your items safe inside the box. Pick simple locks like latches or clasps for easy use. Install them where they do not block access.
Packing And Using Your Kitchen Box
Packing and using your camp kitchen box well makes outdoor cooking simple and fun. A well-packed box saves time and space. It also helps keep things clean and organized. Knowing what to pack and how to care for your gear improves your camping meals and experience.
Essential Cooking Gear
Start with basic items like a portable stove or burner. Include lightweight pots and pans for cooking and boiling water. Pack a sturdy cutting board and a sharp knife. Bring utensils such as spatulas, spoons, and tongs. Don’t forget plates, bowls, and cups that are easy to clean. A small can opener and a bottle opener also come in handy.
Packing Tips For Efficiency
Use containers or bags to group similar items together. Place heavier items at the bottom of the box. Stack pots and pans inside each other to save space. Keep frequently used items on top for quick access. Seal food in airtight bags to prevent spills and bugs. Label containers or bags to find things fast.
Maintenance And Cleaning
Clean all equipment right after use to avoid stains and rust. Use biodegradable soap for washing dishes and utensils. Dry everything completely before packing to stop mold and bad smells. Wipe the inside of the box regularly to keep it fresh. Check gear often and replace any broken or worn-out items.
Credit: www.rei.com
Frequently Asked Questions
What Materials Do I Need For A Camp Kitchen Box?
You need plywood, hinges, screws, handles, and waterproof paint. Include compartments for utensils, stove, and storage. Choose lightweight and durable materials for easy transport and long-lasting use.
How Do I Organize A Camp Kitchen Box Efficiently?
Use separate compartments for utensils, spices, and cookware. Label containers for quick access. Keep frequently used items on top. This organization saves time and keeps your kitchen tidy during camping.
Can I Customize My Camp Kitchen Box Design?
Yes, customize size, compartments, and features based on your needs. Add fold-out tables or cutting boards. Tailor it to your cooking style and camping habits for maximum convenience.
How Do I Protect My Camp Kitchen Box From Weather?
Apply waterproof paint or sealant on wood surfaces. Store the box in a dry place when not in use. Use plastic containers inside to protect utensils and food from moisture.
Conclusion
Building a camp kitchen box makes cooking outdoors easier. It keeps your tools and ingredients organized. You save time setting up and cleaning after meals. Plus, it helps you enjoy your camping trip more. Try customizing your box to fit your needs.
Small steps create big camping improvements. Ready to cook and relax in nature? Your camp kitchen box will help.