
Have you ever noticed your headlamp flickering or going dim while driving at night? It’s not just annoying—it can be dangerous.
Changing your headlamp might seem tricky, but with the right steps, you can do it yourself quickly and safely. Imagine saving time and money by fixing this common problem on your own. In this guide, you’ll learn exactly how to change your headlamp without any hassle.
Keep reading, and soon you’ll feel confident handling this simple car repair like a pro.
:max_bytes(150000):strip_icc()/86736487-56a056335f9b58eba4afef6c-59dbd04c054ad90010ba3060.jpg)
Credit: www.liveabout.com
Tools Needed
Changing a headlamp is easier with the right tools. Having these tools ready saves time and effort. It also helps avoid damage to your vehicle and the new lamp.
Gather the necessary tools before starting the job. Each tool plays a key role in a smooth headlamp replacement.
Phillips And Flathead Screwdrivers
Screwdrivers help remove screws holding the headlamp in place. Both Phillips and flathead types may be needed. Choose screwdrivers that fit the screws well to avoid stripping.
Socket Wrench Set
A socket wrench set loosens bolts securing the headlamp assembly. Different sizes may be required. This tool makes removing tight bolts easier and faster.
Gloves
Wear gloves to protect your hands from dirt and sharp parts. Gloves also keep oils off the new bulb. Clean bulbs last longer and work better.
Replacement Bulb
Have the correct replacement bulb ready. Check your vehicle’s manual for the right type. Using the wrong bulb can cause poor lighting or damage.
Clean Cloth
A clean cloth helps wipe the headlamp lens and your hands. Keeping the lens clean improves light output. Avoid touching the glass part of the bulb directly.

Credit: www.hella-bulbs.com
Safety Precautions
Changing a headlamp is a simple task but requires care. Safety is the most important part before starting. Taking the right steps protects you and your vehicle.
Follow these safety tips to avoid injury and damage. Prepare your workspace and tools carefully. A safe approach saves time and stress.
Turn Off The Engine And Lights
Always switch off the car engine. Make sure all lights are off too. This stops electricity flow and lowers shock risk.
Wear Protective Gloves
Use gloves to protect your hands. They keep dirt and sharp edges away. Gloves also prevent oils from touching the bulb.
Allow The Headlamp To Cool
Wait for the headlamp to cool down. Hot bulbs can burn your skin. Cooling avoids accidents and bulb damage.
Work In A Well-lit Area
Choose a place with good lighting. Clear visibility helps find parts easily. It also prevents mistakes during the change.
Handle Bulbs With Care
Hold bulbs by the base, not the glass. Oils from fingers cause hot spots and shorten bulb life. Handle gently to avoid breakage.
Locate The Headlamp Assembly
Locating the headlamp assembly is the first step to changing a headlamp. Knowing its exact position helps you work safely and quickly. The headlamp assembly holds the bulb and protects it from dust and water.
Every car design is different. The headlamp assembly’s location can vary depending on the vehicle make and model. This section explains how to find it easily.
Open The Car Hood
Start by opening the car hood. Look for the hood release inside the car, usually near the driver’s seat. Pull the lever to pop the hood.
Go to the front of the car and lift the hood fully. Use the hood prop rod if your car has one. This keeps the hood open while you work.
Identify The Headlamp Area
Stand in front of the car. The headlamp assembly is near the front corners. It sits behind the clear lens cover.
Look for the large, clear plastic or glass part on each side of the car’s front. This is the headlamp lens. The assembly is right behind this lens.
Check For Access Panels Or Covers
Some cars have small access panels behind the headlamp lens. These covers protect the bulb and wiring. You may need to remove them to reach the bulb.
Look for clips, screws, or tabs around the back of the headlamp assembly. These keep the covers in place. Use your hands or simple tools to open them carefully.
Access The Bulb
Accessing the bulb is the first step to changing a headlamp. Open the car’s hood and find the back of the headlight. Remove the cover carefully to reach the bulb inside.
Prepare Your Vehicle
Park your car on a flat surface. Turn off the engine and remove the keys. Open the hood carefully and secure it with the prop rod. This step gives you safe access to the headlamp area.
Locate The Headlamp Bulb Cover
Look behind the headlamp assembly for a round or rectangular cover. It may be made of plastic or rubber. This cover protects the bulb and wiring inside the headlamp unit.
Remove The Bulb Cover
Twist or pull the cover gently to remove it. Avoid using too much force to prevent damage. Set the cover aside in a clean, safe place for reinstallation.
Disconnect The Wiring Connector
Find the wiring plug attached to the bulb. Press the clip or tab to release the connector. Pull it straight out without twisting to avoid breaking wires.
Access The Bulb Holder
Look for a metal clip or ring holding the bulb. Release the clip by pressing or twisting it. Carefully pull the bulb holder out of the headlamp assembly.
Remove The Old Bulb
Removing the old headlamp bulb is an important step in changing your car’s headlight. It helps you prepare the headlamp for the new bulb. This task requires care to avoid damage to the socket or wiring.
Before starting, make sure the car is off and the lights are cool. Hot bulbs can burn your fingers. Wear gloves or use a cloth to protect the bulb and your hand.
Open the car hood to find the back of the headlamp assembly. It looks like a round cover or cap. This part protects the bulb and wiring. Some cars may need you to remove a panel or screws first.
Disconnect The Power Connector
Find the power connector attached to the bulb. Gently press the tab or pull the connector straight back. Avoid pulling the wires. This step cuts the power and frees the bulb for removal.
Remove The Bulb Cover
Turn or unclip the bulb cover to open it. This cover keeps moisture and dirt away from the bulb. Set the cover aside carefully to avoid losing it. It will need to go back after the bulb change.
Release The Old Bulb
Some bulbs twist out, others have a clip or spring holding them. Turn the bulb counterclockwise or unclip the spring. Pull the bulb straight out. Do not force it. If stuck, check for extra clips or screws.
Credit: www.youtube.com
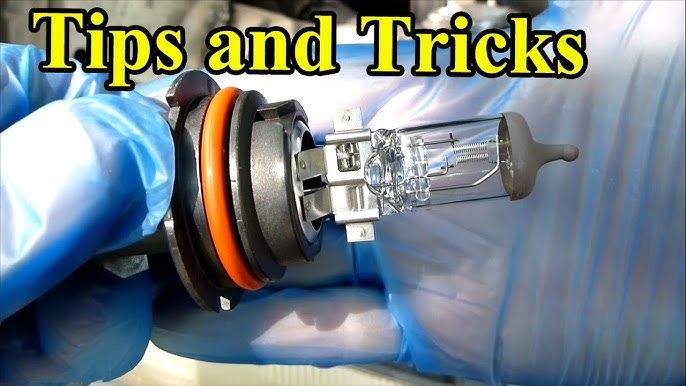
Choose The Right Replacement
Choosing the right replacement headlamp is important for safety and car performance. A proper headlamp helps you see the road clearly and keeps you visible to others.
Different cars need different types of headlamps. Picking the correct one makes installation easier and ensures the light works well.
Check Your Vehicle’s Manual
The manual has information on the exact headlamp type needed. It lists the size, wattage, and style for your car. Follow these details to avoid mistakes.
Identify The Headlamp Type
Headlamps come in halogen, LED, and HID types. Halogen bulbs are common and affordable. LED bulbs use less power and last longer. HID bulbs give bright, white light but cost more.
Match The Bulb Size And Shape
Bulbs have specific shapes and sizes. Using the wrong size can cause poor fit or damage. Check the old bulb or manual for the right size.
Consider Brightness And Color Temperature
Brightness is measured in lumens. Higher lumens mean brighter light. Color temperature affects the light’s color. Choose white or slightly yellow light for better visibility.
Buy From Trusted Brands
Choose brands known for quality and reliability. Poor quality bulbs may burn out quickly or fail. Trusted brands often meet safety standards.
Install The New Bulb
Installing the new headlamp bulb is a crucial step. It ensures your vehicle lights up the road clearly. Follow these simple steps to fit the bulb safely and correctly.
Handle The Bulb Carefully
Hold the bulb by its base, not the glass. Oils from your skin can damage the bulb. Use a clean cloth or gloves to avoid contact.
Align The Bulb Properly
Check the bulb’s shape and tabs. Match them with the socket in the headlamp housing. This ensures a secure and correct fit.
Insert The Bulb Into The Socket
Push the bulb gently into the socket. Do not force it. It should fit snugly and sit flush with the housing.
Secure The Bulb In Place
Fasten the retaining clip or twist the bulb holder. This keeps the bulb stable and prevents it from moving while driving.
Reconnect The Wiring Harness
Attach the wiring connector to the bulb’s base. Make sure it clicks into place. Loose connections can cause flickering or failure.
Test The New Headlamp
Testing the new headlamp is a key step after installation. It ensures the light works correctly and safely. This step helps avoid problems while driving at night or in bad weather. Check the brightness, alignment, and stability of the headlamp before driving.
Turn On The Headlamp
Start by switching on the car’s headlamp. Notice if the light turns on immediately. A delayed or dim light may indicate a problem. Make sure both low and high beams work well. This quick check confirms the bulb is installed properly.
Check The Beam Alignment
Proper beam alignment is vital for safe driving. Stand in front of your car at a flat surface. The light should point straight ahead or slightly downward. Misaligned beams can blind other drivers or reduce your vision. Adjust the headlamp if the light is too high or low.
Inspect For Flickering Or Dimness
Look for any flickering or dim light from the headlamp. Flickering may mean a loose connection or faulty bulb. Dim light can reduce visibility on the road. Tighten the bulb or check the wiring if needed. A steady, bright light is the goal.
Test The Headlamp Stability
Check if the headlamp stays in place while driving. Gently shake the lamp to see if it moves. A loose headlamp can cause poor lighting or damage. Secure the bulb and housing tightly. Stability keeps your headlamp reliable over time.
Tips For Maintenance
Proper maintenance helps your headlamps last longer and work better. It keeps your driving safe, especially at night or in bad weather. Regular checks prevent sudden failures and save money on repairs.
Simple steps can keep your headlamps clear and bright. Clean lenses and check the wiring often. This stops dirt and damage from reducing light output.
Cleaning The Headlamp Lenses
Use a soft cloth and mild soap to clean lenses. Avoid harsh chemicals that can damage the plastic. Clean lenses improve light clarity and road visibility.
Checking For Moisture Inside
Look for fog or water inside the headlamp. Moisture can cause bulbs to fail faster. If you see water, check the seals and fix leaks quickly.
Inspecting Electrical Connections
Check wires and plugs for corrosion or loose contacts. Bad connections can cause flickering or no light. Secure and clean all contacts to keep power steady.
Replacing Bulbs On Time
Do not wait for bulbs to burn out. Replace them at the first sign of dimming. Fresh bulbs give better light and reduce eye strain.
Frequently Asked Questions
How Do I Safely Remove A Headlamp Bulb?
To safely remove a headlamp bulb, first turn off your car and disconnect the battery. Access the headlamp assembly, remove the cover, and carefully twist or unclip the bulb. Avoid touching the glass part of the new bulb to prevent damage.
How Often Should I Change My Headlamp Bulbs?
Headlamp bulbs typically last between 450 and 1,000 hours. Replace them when they dim, flicker, or burn out. Regular checks every six months help ensure safety and visibility while driving at night or in poor weather.
Can I Upgrade To Led Headlamps Myself?
Yes, upgrading to LED headlamps is possible if your vehicle supports them. Purchase compatible LED bulbs, remove the old bulbs, and install the LEDs. Ensure you follow manufacturer instructions for proper fit and avoid electrical issues.
What Tools Do I Need To Change A Headlamp?
Most headlamp changes require basic tools like screwdrivers or socket wrenches. Some cars may need special clips or panel removal tools. Always check your vehicle’s manual to know the exact tools needed for a smooth replacement.
Conclusion
Changing a headlamp can be quick and simple. You only need a few tools and steps. Always check your car manual for guidance. Make sure the new bulb fits well and works before driving. Proper lighting keeps you safe on the road at night.
Take your time and follow each step carefully. Soon, you will feel confident doing this task yourself. Regularly check your headlamps to avoid surprises. Bright lights help you see better and stay visible to others.